Saturday, August 31, 2013

RegisterForEventValidation can only be called during Render();

Introduction: in this post I will explain how we can solve the error “RegisterForEventValidation can only be called during Render();"

RegisterForEventValidation

Description:


Error occur when we try to Export the Data from Controls to Pdf, Excel, Word, CSV. To solve this error add  EnableEventValidation = "false" to @Page directive of .aspx page as shown below:
<%@ Page Language="C#" AutoEventWireup="true" CodeFile="Gridview_SelectExportRow.aspx.cs" Inherits="Gridview_SelectExportRow" EnableEventValidation="false" %>

I hope it will resolve your problem.

Friday, August 30, 2013

How to Get Title, Description, Keywords Meta Tags and Image from URL in Asp.net

Introduction: In this article I will explain how we can Get Title, Description, Keywords Meta Tags and Image from URL in Asp.net.

Description:
Take a new project and put the DLL in Bin folder of Project. Bulid the project. After that add a new webform to project and design as mention below:

<table><tr><td style="width:200px;">Website Url:</td><td> <asp:TextBox ID="txtwebsiteurl" runat="server" Width="831px"></asp:TextBox></td>
</tr>
<tr><td>&nbsp;</td><td><asp:Button ID="btnGet" runat="server" Font-Bold="True" Font-Italic="True"
            onclick="btnGet_Click" Text="Fetch Details" /></td></tr>
            <tr><td>
            Title :</td><td> <asp:TextBox ID="txttitle" runat="server" Width="831px"></asp:TextBox></td></tr>

Thursday, August 29, 2013

How to Export Selected rows of Gridview to Excel, Word and PDF in Asp.net

Introduction: In this article I have explained how to Export the Selected rows of Gridview to Excel, Word and PDF in asp.net.
Export Selected rows of Gridview

Description:

STUDENT_ID
int
STUDENT_NAME
varchar(50)
STUDENT_ADDRESS
varchar(50)
STUDENT_CLASS
varchar(50)

Here ID is autoincrement.
To Export Data we use the 3rd party Library. Here we use the iTextSharp DLL and reference. To download iTextSharp DLL click Here. Put the downloaded iTextSharp DLL in Bin folder and build the project/website and use namespace in .aspx.cs or .aspx.vb page.
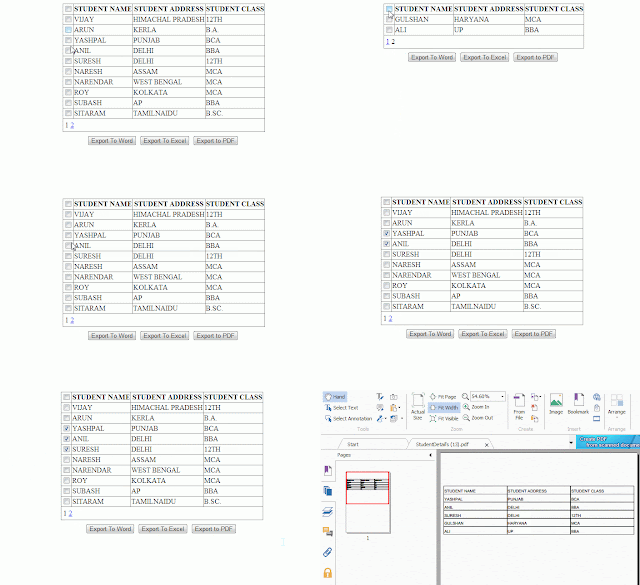
In this exmaple user wil be able select/unselect all rows and can also select/unselect a single row to export. If user click on export button without select row than all data of Gridview will be exported.
Add a webform to project. Darg and drop the control Gridview, button etc. from Toolbox and desgin the .aspx as mention below:

Tuesday, August 27, 2013

Nested Gridview Example in Asp.net OR Gridview inside Gridview in asp.net

Introduction: In this article I have explain how we can use Gridview inside Gridview in asp.net.
Nested Gridview

Description:
In the last article i have explained How to use Checkbox control inside Gridview in asp.net and How to use Join in LINQ Query.
To explain example  I have create 3 Table COUNTRY_DETAIL
ID
int
COUNTRY
varchar(50)
CAPITAL
varchar(50)

STATE_DETAIL
ID
int
STATE_NAME
varchar(50)
POPULATION
bigint
COUNTRY_ID_FK
int

STATE_POPULATION
ID
int
MALE
bigint
FEMALE
bigint
STATE_ID_FK
int

Sunday, August 25, 2013

How to use Join in LINQ Query

Introduction: In this post I have try to explain how we can use the Joins in LINQ.
LINQ

Description:
LINQ_TABLE
LINQ

LINQ_STATE (ID is primary key)
ID
int
STATE
varchar(50)

Add a web form to application. Go to Solution Explorer, right click on website>Add new item> Web from.
Drag and drop a Gridview Data control from from Toolbox>Data.

Wednesday, August 21, 2013

Recovering Forgot Password by Send Reset Link in Asp.net

Introduction: In this article I have explain how we can Send Password Reset Link in Asp.net for one time use only.
Send Password Reset Link

Description:
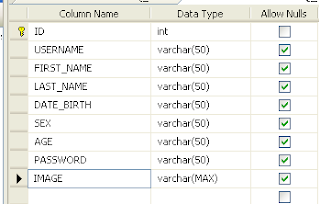
I create table USER_REGISTRATION:
ID
int
USERNAME
varchar(50)
FIRST_NAME
varchar(50)
LAST_NAME
varchar(50)
SEX
varchar(50)
EMAIL_ID
varchar(50)
PASSWORD
varchar(50)
CHANGE_PASSWORD_STATUS
bit

After that add a new webform to project and design the .aspx page as mention below:
<table align="center">
        <tr><td>Email:</td><td>
        <asp:TextBox ID="txtemail" runat="server" Width="150px"></asp:TextBox>
            <asp:RequiredFieldValidator ID="rfvemail" runat="server"
                ErrorMessage="Please Enter Email" ControlToValidate="txtemail"
                ForeColor="Red"></asp:RequiredFieldValidator>
            </td></tr>
        <tr><td>&nbsp;</td><td>
            <asp:Button ID="btnsend" runat="server" Text="Send" onclick="btnsend_Click" /></td></tr>
        </table>

Monday, August 19, 2013

Integrate Facebook Login authentication to website

Introduction: In this article I will explain how we can Integrate Facebook Login authentication to website.
Facebook Login authentication

Description:
To integrate Facebook authentication in website firstly we have to create Facebook App Id. For this open the link https://developers.facebook.com/apps/?action=create. If you are already loged in than you will redirect to Create App other you redirect to login page. After login to Facebook a pop up will open as shown in snapshot:
Facebook Login authentication

Enter App name and click on Continue button. Here I Enter App name Test. After that captcha window will be open and enter the text as shown in attached snapshot:
Facebook Login authentication

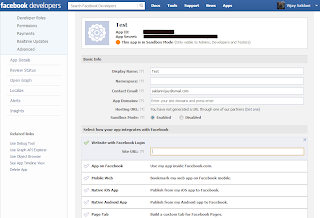
Now you will redirect to your App page and see the structure as attached snapshot:

Facebook Login authentication

Enter URL of your website in Site URL field (e.g. http://www.example.com) and click on save changes button.
Note: if you want to check it on localhost than enter your localhost project URL (e.g. http://localhost:1750 ) here number is your local port number, add this to Site URL field and test it. Enter the updated URL of your application because the port number of your local site can changed any time.

Add a new webform to project. After that add the Facebook Javascript SDK in between body Tag of .aspx page as mention below:

<body>
    <form id="form1" runat="server">
  
    <div id="fb-root"></div>
<script>
    window.fbAsyncInit = function () {
        FB.init({
            appId: '636863302999119', // App ID
            channelUrl: '//' + window.location.hostname + '/channel', // Channel File
            status: true, // check login status
            cookie: true, // enable cookies to allow the server to access the session
            xfbml: true  // parse XFBML
        });

        FB.Event.subscribe('auth.authResponseChange', function (response) {
            // Here we specify what we do with the response anytime this event occurs.
            if (response.status === 'connected') {
                // The response object is returned with a status field that lets the app know the current
                // login status of the person. In this case, we're handling the situation where they
                // have logged in to the app.
                document.getElementById('auth-displayname').innerHTML = me.name;
                testAPI();
            } else if (response.status === 'not_authorized') {
                // In this case, the person is logged into Facebook, but not into the app, so we call
                // FB.login() to prompt them to do so.
                // In real-life usage, you wouldn't want to immediately prompt someone to login
                // like this, for two reasons:
              
                FB.login();
            } else {
                // In this case, the person is not logged into Facebook, so we call the login()
                FB.login();
            }
        });
    };

    // Load the SDK asynchronously
    (function (d) {
        var js, id = 'facebook-jssdk', ref = d.getElementsByTagName('script')[0];
        if (d.getElementById(id)) { return; }
        js = d.createElement('script'); js.id = id; js.async = true;
        js.src = "//connect.facebook.net/en_US/all.js";
        ref.parentNode.insertBefore(js, ref);
    } (document));
</script>

<!--
  Below we include the Login Button social plugin. This button uses the JavaScript SDK to
  present a graphical Login button that triggers the FB.login() function when clicked.

  Learn more about options for the login button plugin:
  /docs/reference/plugins/login/ -->

<table align="center">
<tr><td>
<div id="auth-status">
<div class="fb-login-button" show-faces="true" autologoutlink="true" scope="email,user_checkins">Login with Facebook</div>
<div id="auth-loggedout">
</div>
</td></tr>
</table>
    </form>
</body>

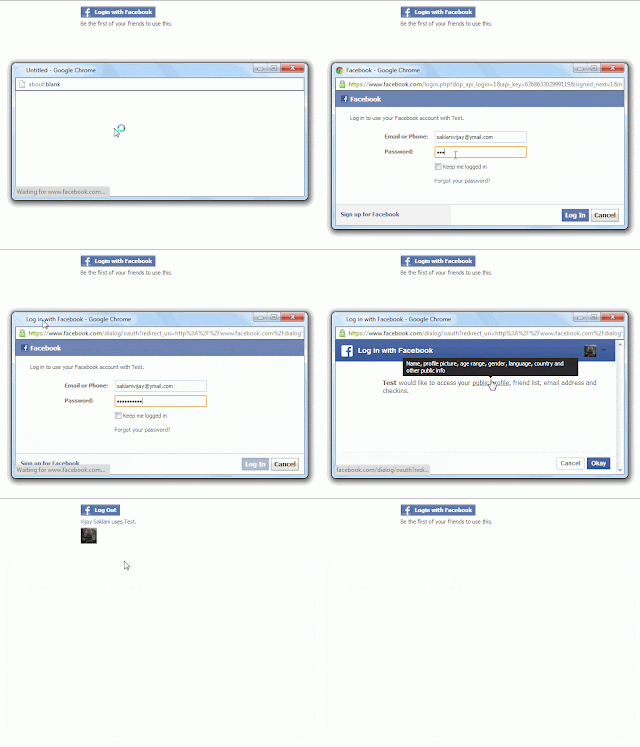
Run the project an check out the result.

Saturday, August 17, 2013

How to use Ajax CollapsiblePanelExtender control on Asp.net OR Ajax CollapsiblePanelExtender control Example

Introduction: In this article I will try to explain how we can use the Ajax CollapsiblePanelExtender in Asp.net.

Description:

 We use CollapsiblePanelExtender to create collapsible panel i.e. click on down arrow panel will expand and click on up arrow will collapse automatically. CollapsiblePanelExtender Properties:

TargetControlID: Panel ID to expand and collapse
CollapseControlID: ID used to collapse on click
ExpandControlID: ID used to expand on click
CollapsedImage: path of image used by ImageControlID when the panel is collasped
ExpandedImage:  path of image used by ImageControlID when the panel is expand
TextLabelID: ID of the label where STATUS TEXT for the panel will be placed.
CollapsedText: text to show in control specified by TextLabelID when panel is collapsed
ExpandedText: text to show in control specified by TextLabelID when panel is expand
Collapsed: specifies that object should initially be colasped or expanded
ImageControlID: ID of image control where icon indicating the collapsed status of the panel. Extender will replace the image source with CollapsedImage and ExpandedImage.
AutoCollapse: automatically collaspe when mouse is moved over the panel. Automatically it’s true
AutoExpand: automatically expand when mouse is moved over the panel. Automatically it’s true

Wednesday, August 14, 2013

How to use Checkbox control inside Gridview in asp.net

Introduction: In this article I will explain how we can use the checkbox control inside the Gridview in Asp.net.

I have a Gridview binded to database and show detail of Register user who are not authorized by admin yet. Here I give the option to select/Unselect all unauthorized user from header checkbox or single-2 checkbox selection.

Sunday, August 11, 2013

How to get the Lists of number of store procedures and tables in Database in sql server

Introduction: In this post I will explain we can get the Lists of number of store procedures and tables in Database in sql server.

Description:

Get list of All tables in Database:
use TEST_APPLICATION
select * from sys.tables
OR
select * from sys.tables
Here TEST_APPLICATION is the name of Database.
Get list of all Store procedure in Database:
use TEST_APPLICATION
select * from sys.procedures
OR
select * from sys.procedures
Here TEST_APPLICATION is the name of Database.

Saturday, August 10, 2013

How to Excecute Store Procedure in Sql Server

Introduction: In this post I will explain we can Excecute the Store procedure in Sql Server.
Description:
use TEST_APPLICATION

exec dbo.DISPLAY_USERS
OR
exec dbo.DISPLAY_USERS

Here TEST_APPLICATION is the name of Database and dbo.DISPLAY_USERS name of store procedure. Execute it, display the output of store procedure.

Friday, August 9, 2013

How to Create Change Password form/page in Asp.net

Introduction: In this post I will explain how we can Change the Password in Asp.net.
Change Password

Description:

Users want to change their password. Users redirect to change password page and enter current password after that new password and confirm the password. Firstly here we check the users session on page load and after that check the current password on button click. If current password is correct than  user will be able to change the password successfully.

Thursday, August 8, 2013

How to use Ajax FilteredTextBoxExtender control in Asp.net OR Ajax FilteredTextBoxExtender Example

Introduction: In this post I will explain how we can use the Ajax FilteredTextBoxExtender control in Asp.net.
FilteredTextBoxExtender

Description:

FilteredTextBoxExtender used to prevent the user to enter invalid characters to Textbox. FilteredTextBoxExtender Properties:
TargetControlID: ID of Textbox for FilteredTextBoxExtender to operate on
FilterType: Filter type apply on Textbox, as a comma seprated combination of Numbers, Uppercase Letters, Lowercase Letters and Custom.
ValidChars: If Filtertype is Custom than use this property otherwise ignore.

Wednesday, August 7, 2013

How to Export Gridview Data to Word in Asp.net

Introduction: In this article I will explain how we can Export the Gridview Data to Word in Asp.net
Description:
Take a new website. Add a webform to website and design .aspx page as shown below:
<body>
    <form id="form1" runat="server">
    <div>
     <table>
    <tr><td>&nbsp;</td><td align="right">
        <asp:Button ID="Button1" runat="server" Text="Export To MS-WORD"
            onclick="Button1_Click" /></td></tr>
    <tr><td>&nbsp;</td><td> <asp:GridView ID="grdstudent" runat="server" AutoGenerateColumns="false" DataKeyNames="STUDENT_ID" DataSourceID="SqlDataSource1">
        <Columns>
        <asp:BoundField DataField="STUDENT_NAME" HeaderText="STUDENT NAME" />
        <asp:BoundField DataField="STUDENT_ADDRESS" HeaderText="STUDENT ADDRESS" />
        <asp:BoundField DataField="STUDENT_CLASS" HeaderText="STUDENT CLASS" />
        </Columns>
        </asp:GridView></td></tr>
    </table>
      

Remember Username and Password using Remember me checkbox during login in asp.net

Introduction: In this article I will epxlain how we can remember USERNAME and PASSWORD using Remember me checkbox during login in asp.net.
Remember Username and Password

Description:
I created a Table USER_REGISTRATION:
ID
int
USERNAME
varchar(50)
PASSWORD
varchar(50)
FIRST_NAME
varchar(50)
LAST_NAME
varchar(50)
SEX
varchar(50)
EMAIL_ID
varchar(50)

Here ID is autoincrement and primary key. Registers user detail/information store in table and check the username and password detlais on login page.